Real Food Recipe: Guilt-free Choc-Banana-Chia Cakelets

Thrive Primal - paleo chocolate banana chia cake recipe

Ok, not gonna lie friends, I’ve been coming up with some winners lately. The zucchini pancakes were delightful, and the easy 5-ingredient pork & pea soup was out of this world.

Today we have reached new heights in the easy quick paleo/primal-friendly dessert category. These paleo banana chocolate chip chia seed cakelets are pretty freakin scrumpsh.

You could also get away with having cake for breakfast if you’re feeling indulgent. They’re pretty high in protein and fiber, plus some healthy fat and not much sweet stuff at all. Just 1 ripe banana and 1/2 cup dark chocolate chips (divided between 6 servings).

Real Food Recipe: Guilt-free Choc-Banana-Chia Cakelets

Prep Time: 5 minutes

Cook Time: 20 minutes

Total Time: 25 minutes

Yield: 6 cakelets

Real Food Recipe: Guilt-free Choc-Banana-Chia Cakelets

A tasty gooey gluten-free cakelet that's perfect for dessert and healthy enough for breakfast too, once in a while ;)

Ingredients

Instructions

  1. Preheat the oven to 350 F.
  2. Mash the banana in a mixing bowl.
  3. Add in all the other ingredients and mix well.
  4. Pour into 6 silicone muffin cups (you NEED these, they will change your life!!!! especially if you bake with a lot of coconut / rice / almond flour).
  5. Bake for 20 minutes at 350 F.
  6. Enjoy sliced in half with grass-fed butter on top. YUM.
https://www.thriveprimal.com/real-food-recipe-paleo-chocolate-banana-cake/

If you try these, let me know what you think! Did you use all good-quality ingredients? Would you alter the recipe at all? Do you think these are healthy and nutritious enough to fit in with your paleo/primal-oriented diet? Or are they just for a rare treat? 80-20 rule! ;) Enjoy!!

Thrive Primal - paleo chocolate banana chia cake recipe


want to pin this_Thrive Primal-01

How to Make Sauerkraut in 3 Steps: DIY Probiotic!

Thrive Primal - how to make sauerkraut

Eating fermented foods is a must if you want to optimally digest and absorb everything you eat. Our ancestors ate cultured and fermented foods constantly, so we would have a steady stream of friendly bacteria coming into our system. Nowadays these traditional foods have mostly fallen by the wayside, along with their plentiful benefits.

Everyone should eat fermented and cultured foods, but particularly if you suffer from any sort of chronic health issues. I find it really helps my digestion!

Why it’s worth it to DIY instead of buy

Store-bought probiotic foods or capsules will never be as fresh or contain as many friendly bacteria as what you make at home. Plus they are super expensive.

They are also frequently pre-pasteurized, and then the culture is added back in. This is a crappy unnatural way of doing things according to the requirements of the food industry. Making things yourself gets you the biggest health benefit and saves you the most cash.

FACT: The fermentation process of sauerkraut causes the vitamin C content to multiply by 10 x! Sailors historically ate sauerkraut to avoid scurvy because it was so nutritious and didn’t spoil easily.

How to make sauerkraut in 3 steps

First collect your stuff.

  • Cabbage (any size and type will do, organic is best)
  • Knife and chopping board
  • Large mixing bowl
  • Large glass jar (bigger than your cabbage. I normally use a medium-size cabbage and a 2L jar)
  • Another smaller jar that fits inside the mouth of your large jar. I normally use something like a tall skinny olive jar or sauce jar.
  • Salt (Pink Himalayan Salt is best, but sea salt is still better than table salt)
  • Whey (optional. You can buy this from a local farm or make your own from yogurt)

If you use whey, your sauerkraut will be ready in 3-4 days. If you don’t, it will take 1-2 weeks.

Step 1: Chop

Take off the outer 2 leaves of your cabbage and set them aside – you’ll need them later. Then go nuts and chop your cabbage as small as you can be bothered chopping it. The pieces definitely shouldn’t be any bigger than 1cm x 1cm, but they can be as small as you want (but not puree!). If you have a good food processor you can use that too.

how to make sauerkraut - step 1

Step 2: Salt and Sit

Get your bowl and plunk in about 1/3 of your cabbage, then sprinkle a big tablespoon of salt over it. Put in another 1/3, then another tablespoon of salt. Last 1/3, then 2 tbsp of salt. The rough guideline here is 4 tbsp salt per 1 kg of cabbage. Generally this would mean 3 tbsp salt for a small cabbage, 4 tbsp for a medium cabbage, 5-6 tbsp for a large cabbage.

Then let your salted cabbage sit for about 20 minutes. The salt draws the moisture out of the cabbage.

how to make sauerkraut - step 2

Step 3: Knead and Pack

Spend about 5 minutes or so kneading, squeezing and punching your cabbage to get as much juice out of it as possible. The goal is to get enough juice out to cover the cabbage once it goes in the jar.

how to make sauerkraut - step 3

Pack it into the jar as tightly as you can, pushing it down to get any air out. Add a few tbsp of whey if you’re using it.

how to make sauerkraut - step 3

At this point see how much liquid you have – you might need to top up with a little more whey or water (filtered/purified if possible). The liquid should be 1-2 cm above the top of the packed cabbage surface.

It’s imperative that the liquid covers the cabbage bits since we are going for anaerobic fermentation (no air contact allowed!).how to make sauerkraut - step 3

Grab the cabbage leaves you saved earlier, fold them and place them on top to make as good of a ‘lid’ as you can. This is to keep the cabbage below the liquid. Weigh down this lid with your smaller jar. Put some water in the smaller jar to keep it weighed. Check that all of the chopped/packed cabbage is below the liquid. This is important to avoid mold. It’s ok if the cabbage leaf ‘lid’ pokes above the liquid, because you won’t be eating it.

how to make sauerkraut - step 3

how to make sauerkraut - step 3

How to check that your sauerkraut is ready

That’s it! Now place it in a cupboard or a cool dark place out of the way somewhere. Wait for 3-4 days if you used whey, or 1-2 weeks if you didn’t.

It’s always safe to taste, as long as there is no mold. You’ll know it’s ready when it starts to taste kind of sour, fizzy, and a lot less salty. When it’s lost enough saltiness for you, take out the weight and the leaf lid, put the lid on the big jar and keep the sauerkraut in the fridge.

A few tips:

  • If your big jar ends up being pretty full, I recommend putting it in a big bowl while it’s fermenting. There will be gases produced and the liquid level might rise. The big bowl is in case of overflow.
  • Keep checking it to make sure everything is below the liquid. Add a little water if it’s looking a bit dry.
  • If you see mold, most articles I’ve read recommend throwing out the whole batch. If you’re not sure whether it’s mold (ie a small white floating patch) you could scoop out a significant area surrounding it, and then continue fermenting. If the white stuff / mold doesn’t come back after a few days, it should be safe.
  • As a general rule, if there’s no mold it’s safe to eat. Mold is a risky area and if in doubt, just get rid of it and start again. Next time make sure you pack the cabbage down really well, put enough liquid in, and keep everything consistenly below the liquid level.

Thrive Primal - how to make sauerkraut

want to pin this_Thrive Primal-01

How did it go?

Share your tips, questions, comments, experiences below. Is your digestion better? Skin clearing up? Immunity boosted? Sauerkraut rocks :)

The Best Clean Paleo Primal Protein Powder

Thrive Primal - best paleo protein powder

Scary junk in commercial protein powders

First things first, let’s start with why you don’t want to go buying that typical protein shake from Walmart or GNC or Herbalife or Isagenix. As explained in this article by leading natural physician Dr. Mercola, commercial protein powders often contain concerning amounts of heavy metals like mercury and cadmium.

Also if you read the ingredients, you will find a long list of things like artificial flavours, sweeteners, thickeners, texturizers, gums, and waxes. Plus the protein is from non-organic milk, so you’re getting all the hormones and pesticides from that. Consider that in making the whey the milk gets concentrated, so those chemicals get concentrated too.

Finally, they are high-heat processed so the protein molecules become denatured and aren’t as useful to the body. Basically commercial protein powders are a massive waste of money, and could actually be toxic.

But isn’t whey isolate best?

When we were initially researching the best protein powder, Dave Asprey the Bulletproof Exec was recommending cold-processed cross-flow microfiltered whey isolate. This was supposed to be the cleanest, purest source of protein to eliminate all those nasty toxins & ingredients mentioned above.

However, excuse my dumb non-sciencey language, but whey isolate is basically a “chemistry molecule”. Kind of like taking a vitamin C supplement instead of eating an orange. It’s just one constituent of the food and the body doesn’t quite know what to do with it. When you eat the whole orange (or get all the proteins from natural milk), your body understands how to use it most effectively. (Dave Asprey has now changed his recommendation to a less-processed form, see more below – his product is my second best go-to)

Ok, so real-food protein powder is better

Will gets all the credit for finding our current favourite, and in my opinion the Best Paleo Protein Powder. He wanted to get more muscley and wanted to do it in a healthy way. Sounds good to me! ;)

He found that Protein 17 is the most minimally-processed, well-sourced, real-food based protein powder on the market right now (that we know of!). When they use minimally-processed complete milk proteins, you’re getting all the goodness of the milk, (not just the “chemistry molecule”! ha.) This includes enzymes like lactase, and minerals like magnesium. Protein 17 is actually a pretty good source of magnesium, which is something our diets often lack.

From the Protein 17 website:

protein 17 best paleo protein powder

I like how Protein 17 gives the most information about exactly how the whey powder is processed. There are a number available that say they are organic and grass-fed, but they don’t specify nearly as much about how the delicate immune-supporting proteins from the milk are minimally processed so that they remain intact.

They even explain on the container how there are no additives to make it blend with water (like most protein powders have), so it’s necessary to use a mixer or magic bullet.

It currently has 207 five-star reviews on Amazon which I found pretty dang impressive and clearly those folks are super-discerning customers. The only grass-fed organic whey on Amazon that has more reviews (Tera’s Whey, 275 reviews, 4.5 stars) doesn’t specify their processing methods, so I’m not as apt to trust it.

The second best choice for Paleo protein powder

If you see anything on your protein powder that says it “mixes easily with water” or “dissolves instantly”, that should be a red flag for additives. However, if you can’t deal with having to blend Protein 17 every time, my next best recommendation is Upgraded Bulletproof Whey.

It also contains coconut MCT (a healthy fat) for brain-power and colostrum for immunity.

Dave Asprey is a badass and does his research to the max, so I would be open to trusting and buying his products. In fact I have his Upgraded coffee beanstoxin-free vanilla, and MCT oil.

If whole foods are better, why would you use protein powder at all

Good question, and totally valid point. Generally speaking we certainly stick to whole foods 95% of the time, (and real food 99% of the time! except maybe the very occasional hung-over McDonalds feast. GASP! Yes, I said it!)

However, as discussed above, Protein 17 is pretty darn close to a whole food. And 3 other things come into play here:

  • convenience – sometimes we just need grab-and-go nutrition!
  • cost – having protein as a supplement helps save a bit on buying whole meat, poultry and fish
  • “eatability” – Will wants to consume more protein for muscle-building, but a normal person in a normal daily life can only physically eat so much. While lean muscle is awesome, neither of us really want to eat 1.5 lbs of meat at every meal. And that would get mighty expensive.

What we use protein powder for:

  • to add nutrition to our “paleo treats” recipes like muffins, loafs and pancakes, as well as to smoothies. We make baked stuff for easy breakfasts sometimes (see one of my recipes here)
  • Will has a protein shake every day after working out (raw organic grass-fed milk and Protein 17) for manly muscley purposes

That’s basically it. What do you use it for?

Share your experience with paleo protein powder

What are your thoughts on using protein powder as a smart nutritional supplement? What protein powder do you think is best? Has protein powder helped you achieve your goals? Has this article enlighted you to reconsider your approach to protein powder? Let me know your thoughts below!

Thrive Primal - best paleo protein powder


want to pin this_Thrive Primal-01

protein scoops image source

How to not get overwhelmed with healthy lifestyle changes

Thrive Primal - how to avoid getting overwhelmed with healthy lifestyle changes
When you have chronic pain and digestive discomfort and headaches and anxiety and you’re tired and your hectic week just keeps rollin’ on, it’s easy to get overwhelmed with the healthy changes you’re trying to make.
You might be spending hours a day researching what to avoid and what to buy and what to eat, and then realise you’ve gotten away from what you’re trying to do in the first place, which is chill out, and love yourself, and let your body heal.
I’ve been there, and I still go there at times. I call it a ‘brain full of butterflies’. You’re trying to catch one, but then another pretty one catches your eye so you go for it, but then you start going after a better one, and they’re all just flying around driving you crazy.

How to get past overwhelm when you’re working on healthy lifestyle changes

Here’s a quick 5-minute pen and paper exercise to get all those butterflies out of your brain, nail them down, and get your shit together so you can take a deep breath and have some peace.
Get out a pen and a piece of paper or a receipt or a napkin and do this RIGHT NOW. Don’t click to another tab and start googling another shiny solution. Do the work. Do it now. This will help you. Take a deep breath.

STEP 1:

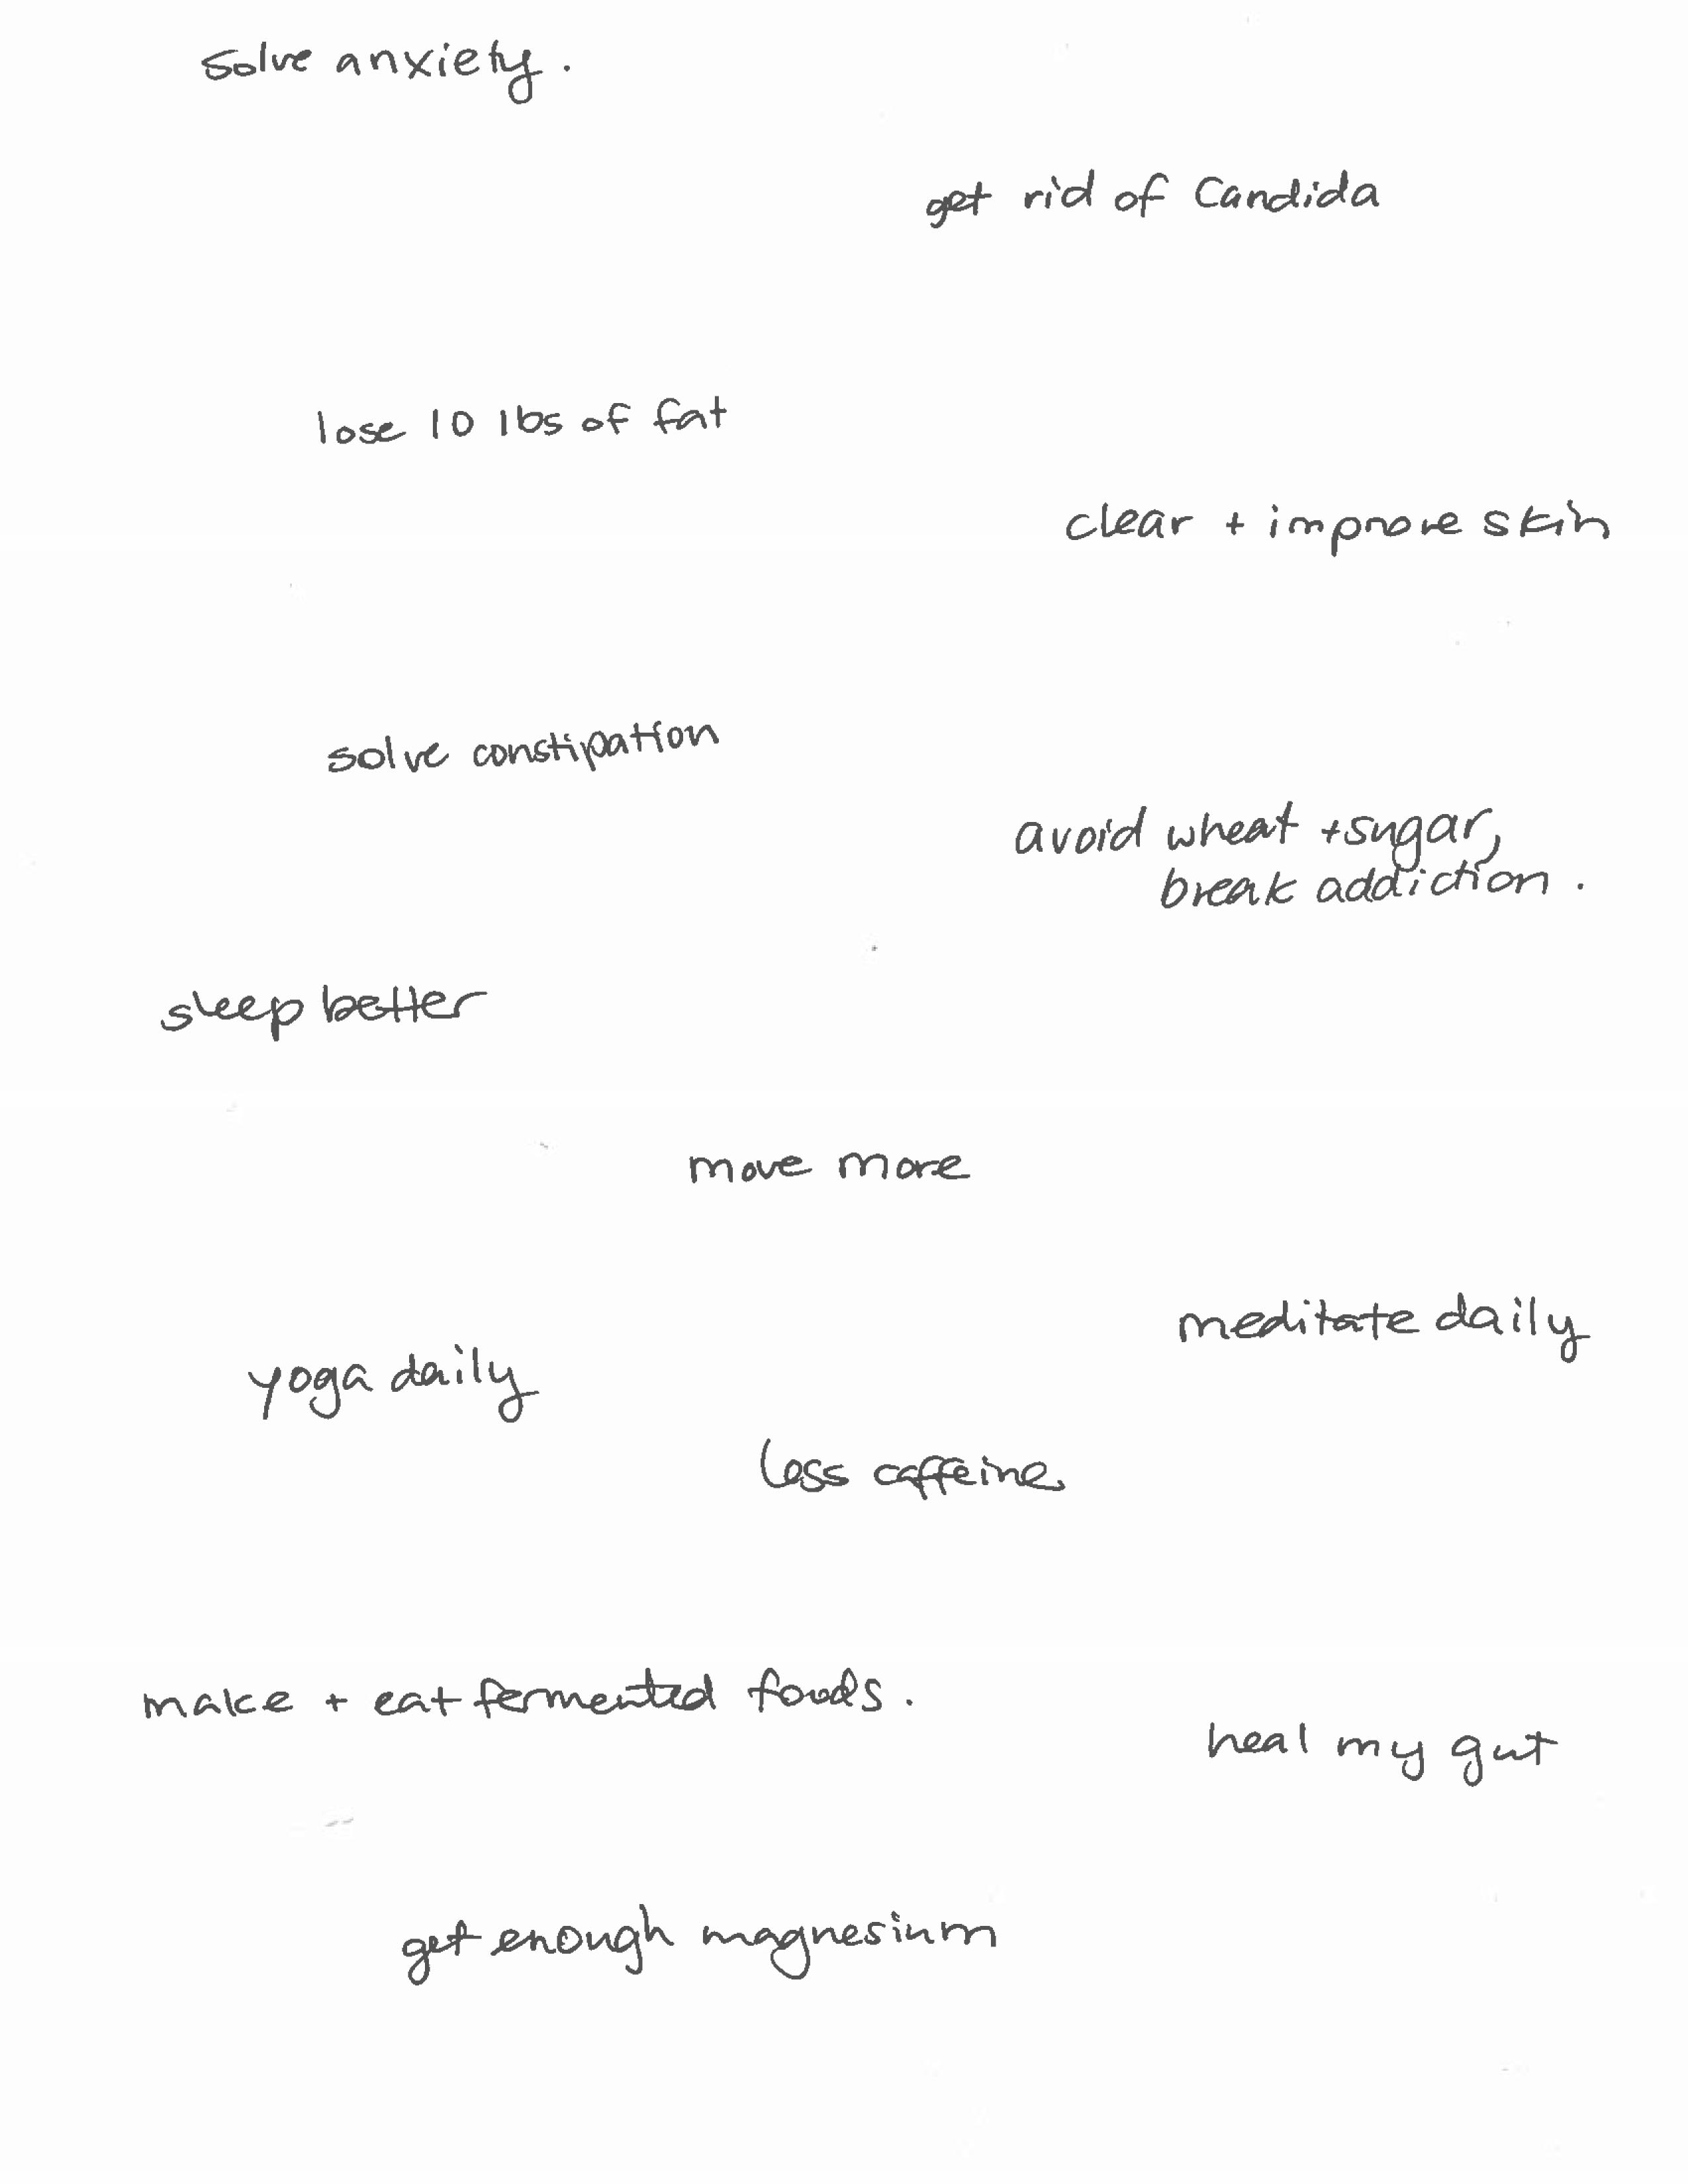
Scribble down all the health and wellness goals you want to achieve. I’ve decided to get raw, real and vulnerable here, and share mine.
  • solve anxiety
  • doTerra 30 day reset / cleanse
  • get rid of Candida
  • lose 10 lbs of fat
  • clear and improve skin
  • solve constipation
  • avoid wheat & sugar, break addiction
  • sleep better
  • move more
  • yoga daily
  • meditate daily
  • less caffeine, or none
  • make & eat fermented foods
  • heal my gut
  • get enough magnesium
 It would be nice to have all of those things wouldn’t it! But think about all the steps I need to take, OMG. So overwhelming. If I chase all of those butterflies how many will I catch – NONE!
But what’s awesome about the body is that everything is connected and interdependent. So you will find that many of your health goals will be inter-connected, and some big ones might end up being tipping points for a bunch of other ones.
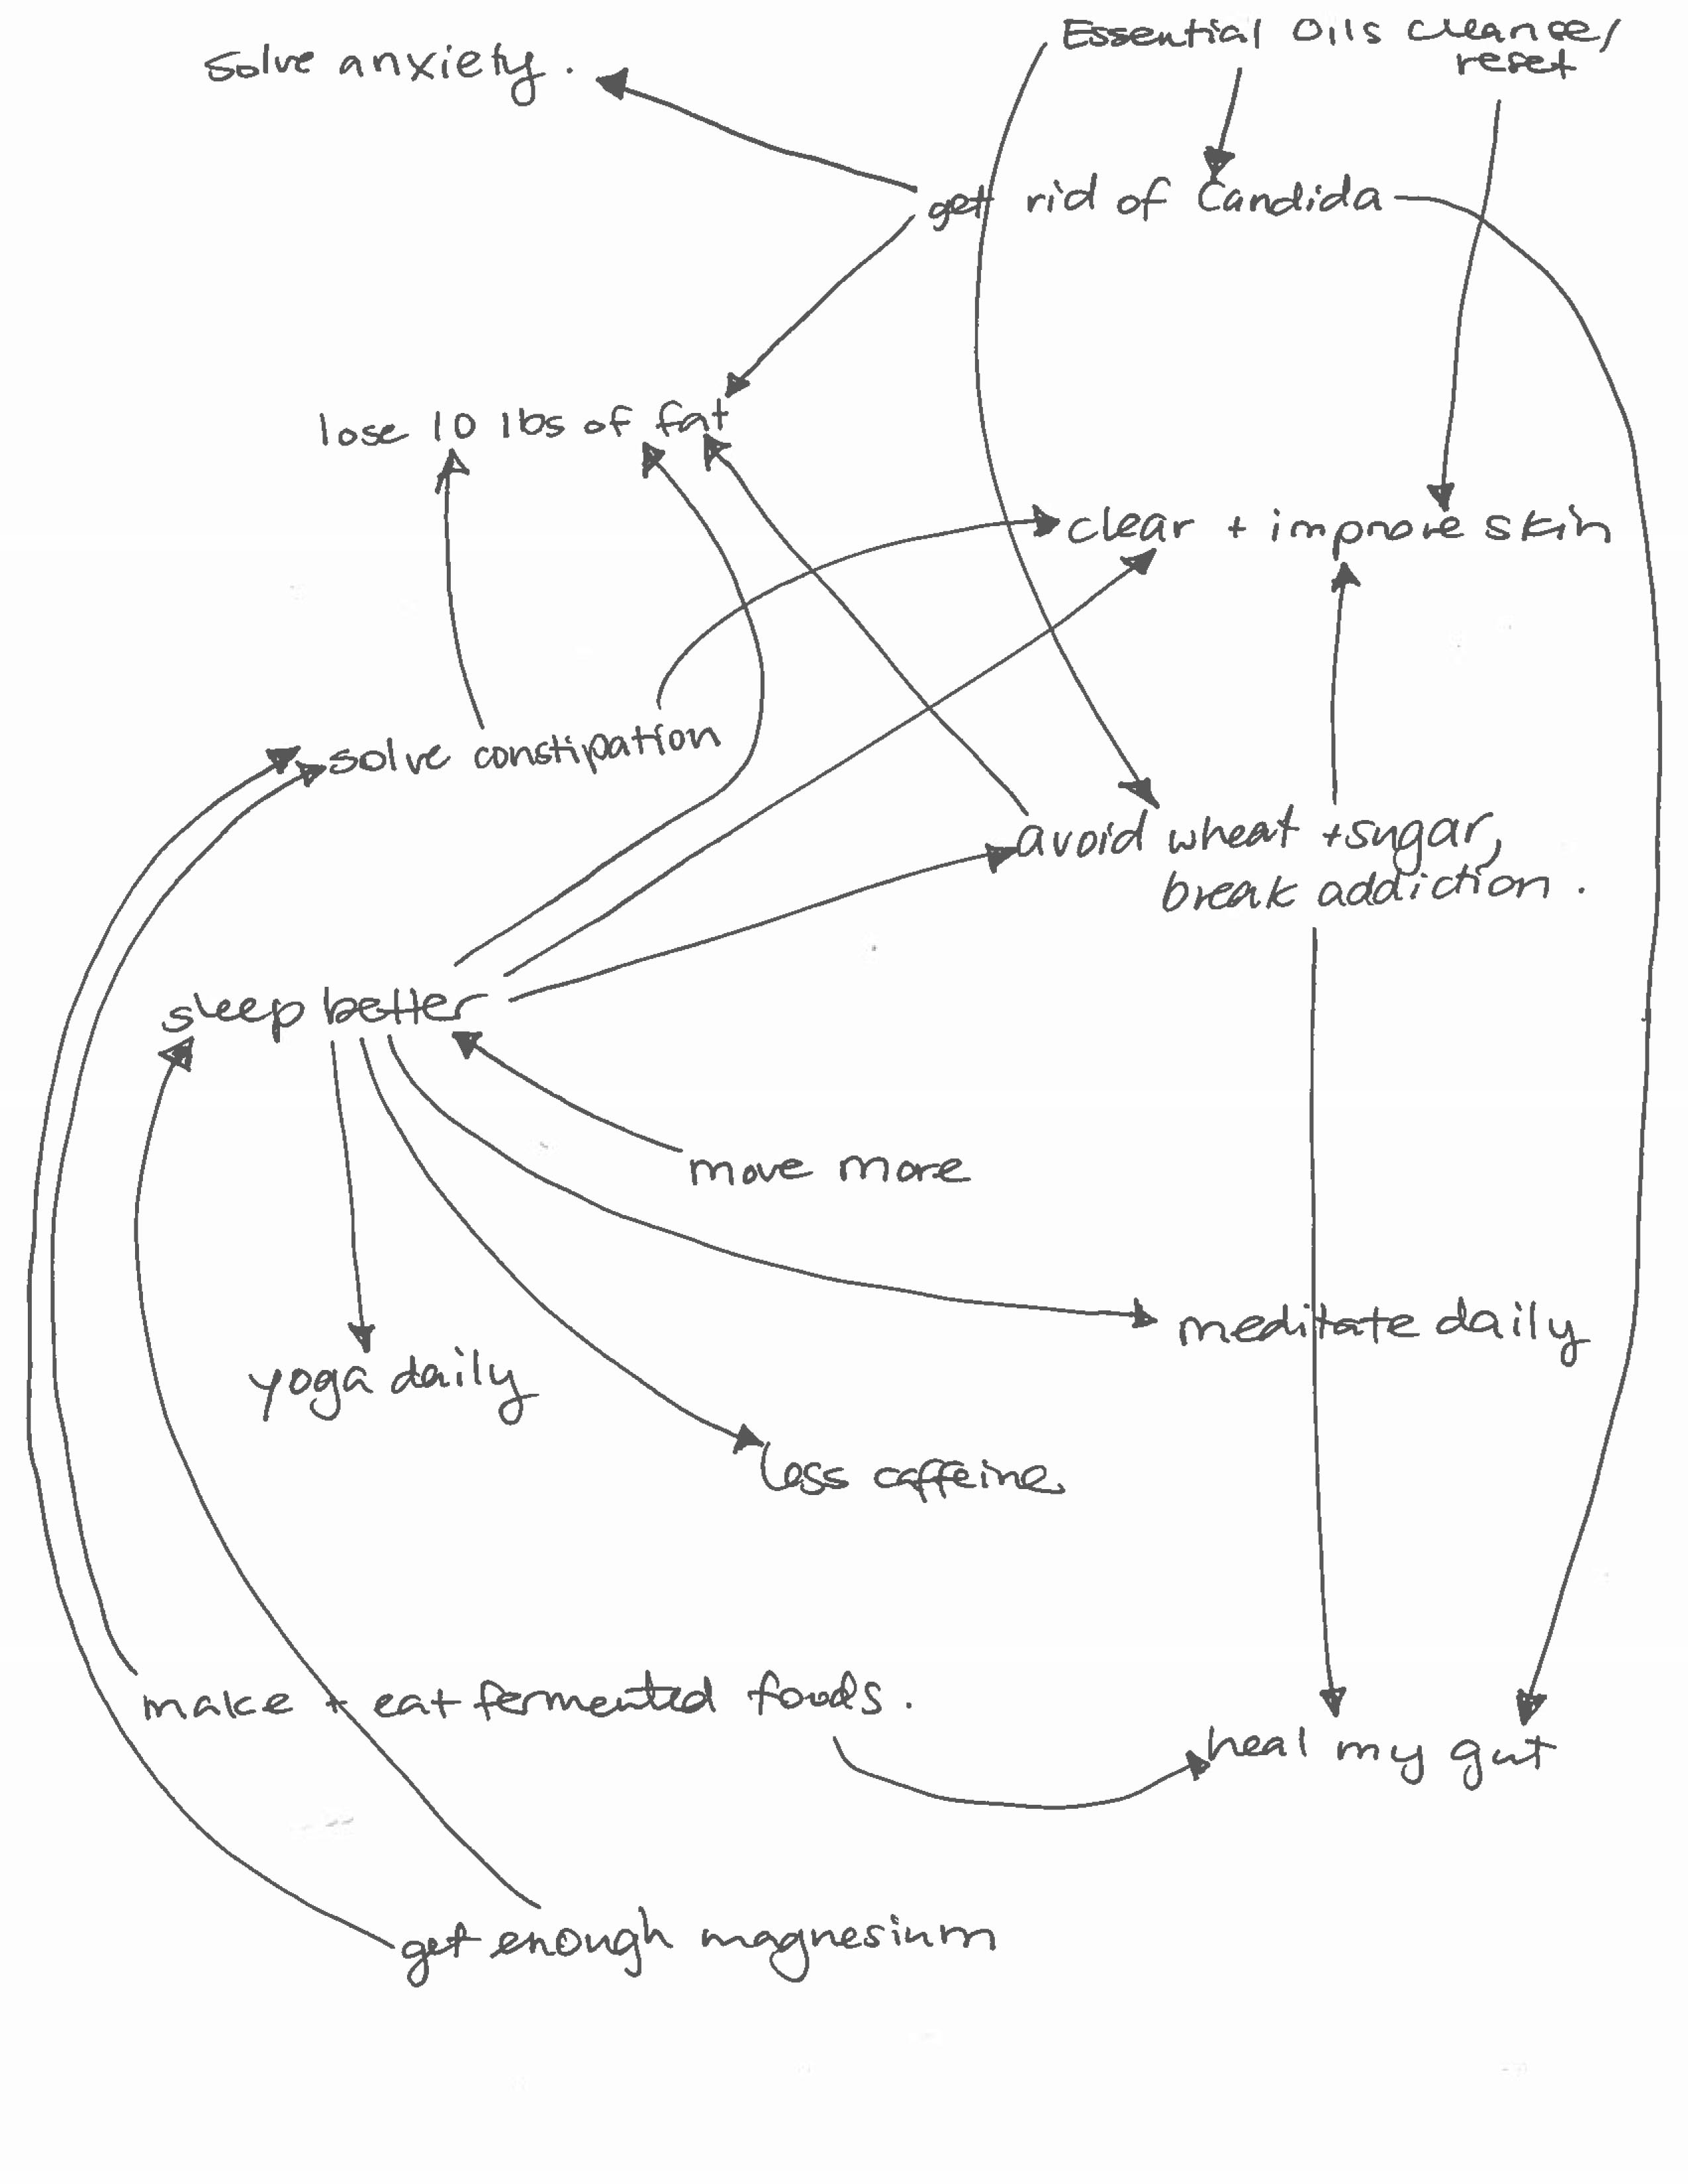
I mapped them out like this all over a sheet of paper. This whole exercise took me maybe 5 minutes. If you still haven’t gotten your pen and paper out, DO IT NOW!
Thrive Primal - how to prevent overwhelm with lifestyle changes

STEP 2:

Start drawing arrows between ones that might cause or naturally lead to another.
 For example, I want to improve my skin, and I know if I consume more fermented foods and get more sleep those things will cause me to have better skin. So I draw arrows from those 2 things pointing to better skin.
I know that if I avoid wheat & sugar, that will help heal my gut. I know that if I get rid of Candida, that will solve my anxiety and constipation. I know if I can sleep better that will help me lose fat. etc etc.
Keep doing that until you can’t think of any more.
Thrive Primal - how to prevent overwhelm with lifestyle changes

 STEP 3:

Look at all the things and notice which ones don’t have any arrows pointing into them, ie which ones are just plain ACTIONS that you must take.
Mine were:
  • Get enough magnesium
  • Make and consume fermented foods
  • Move more
  • Do an essential oils cleanse
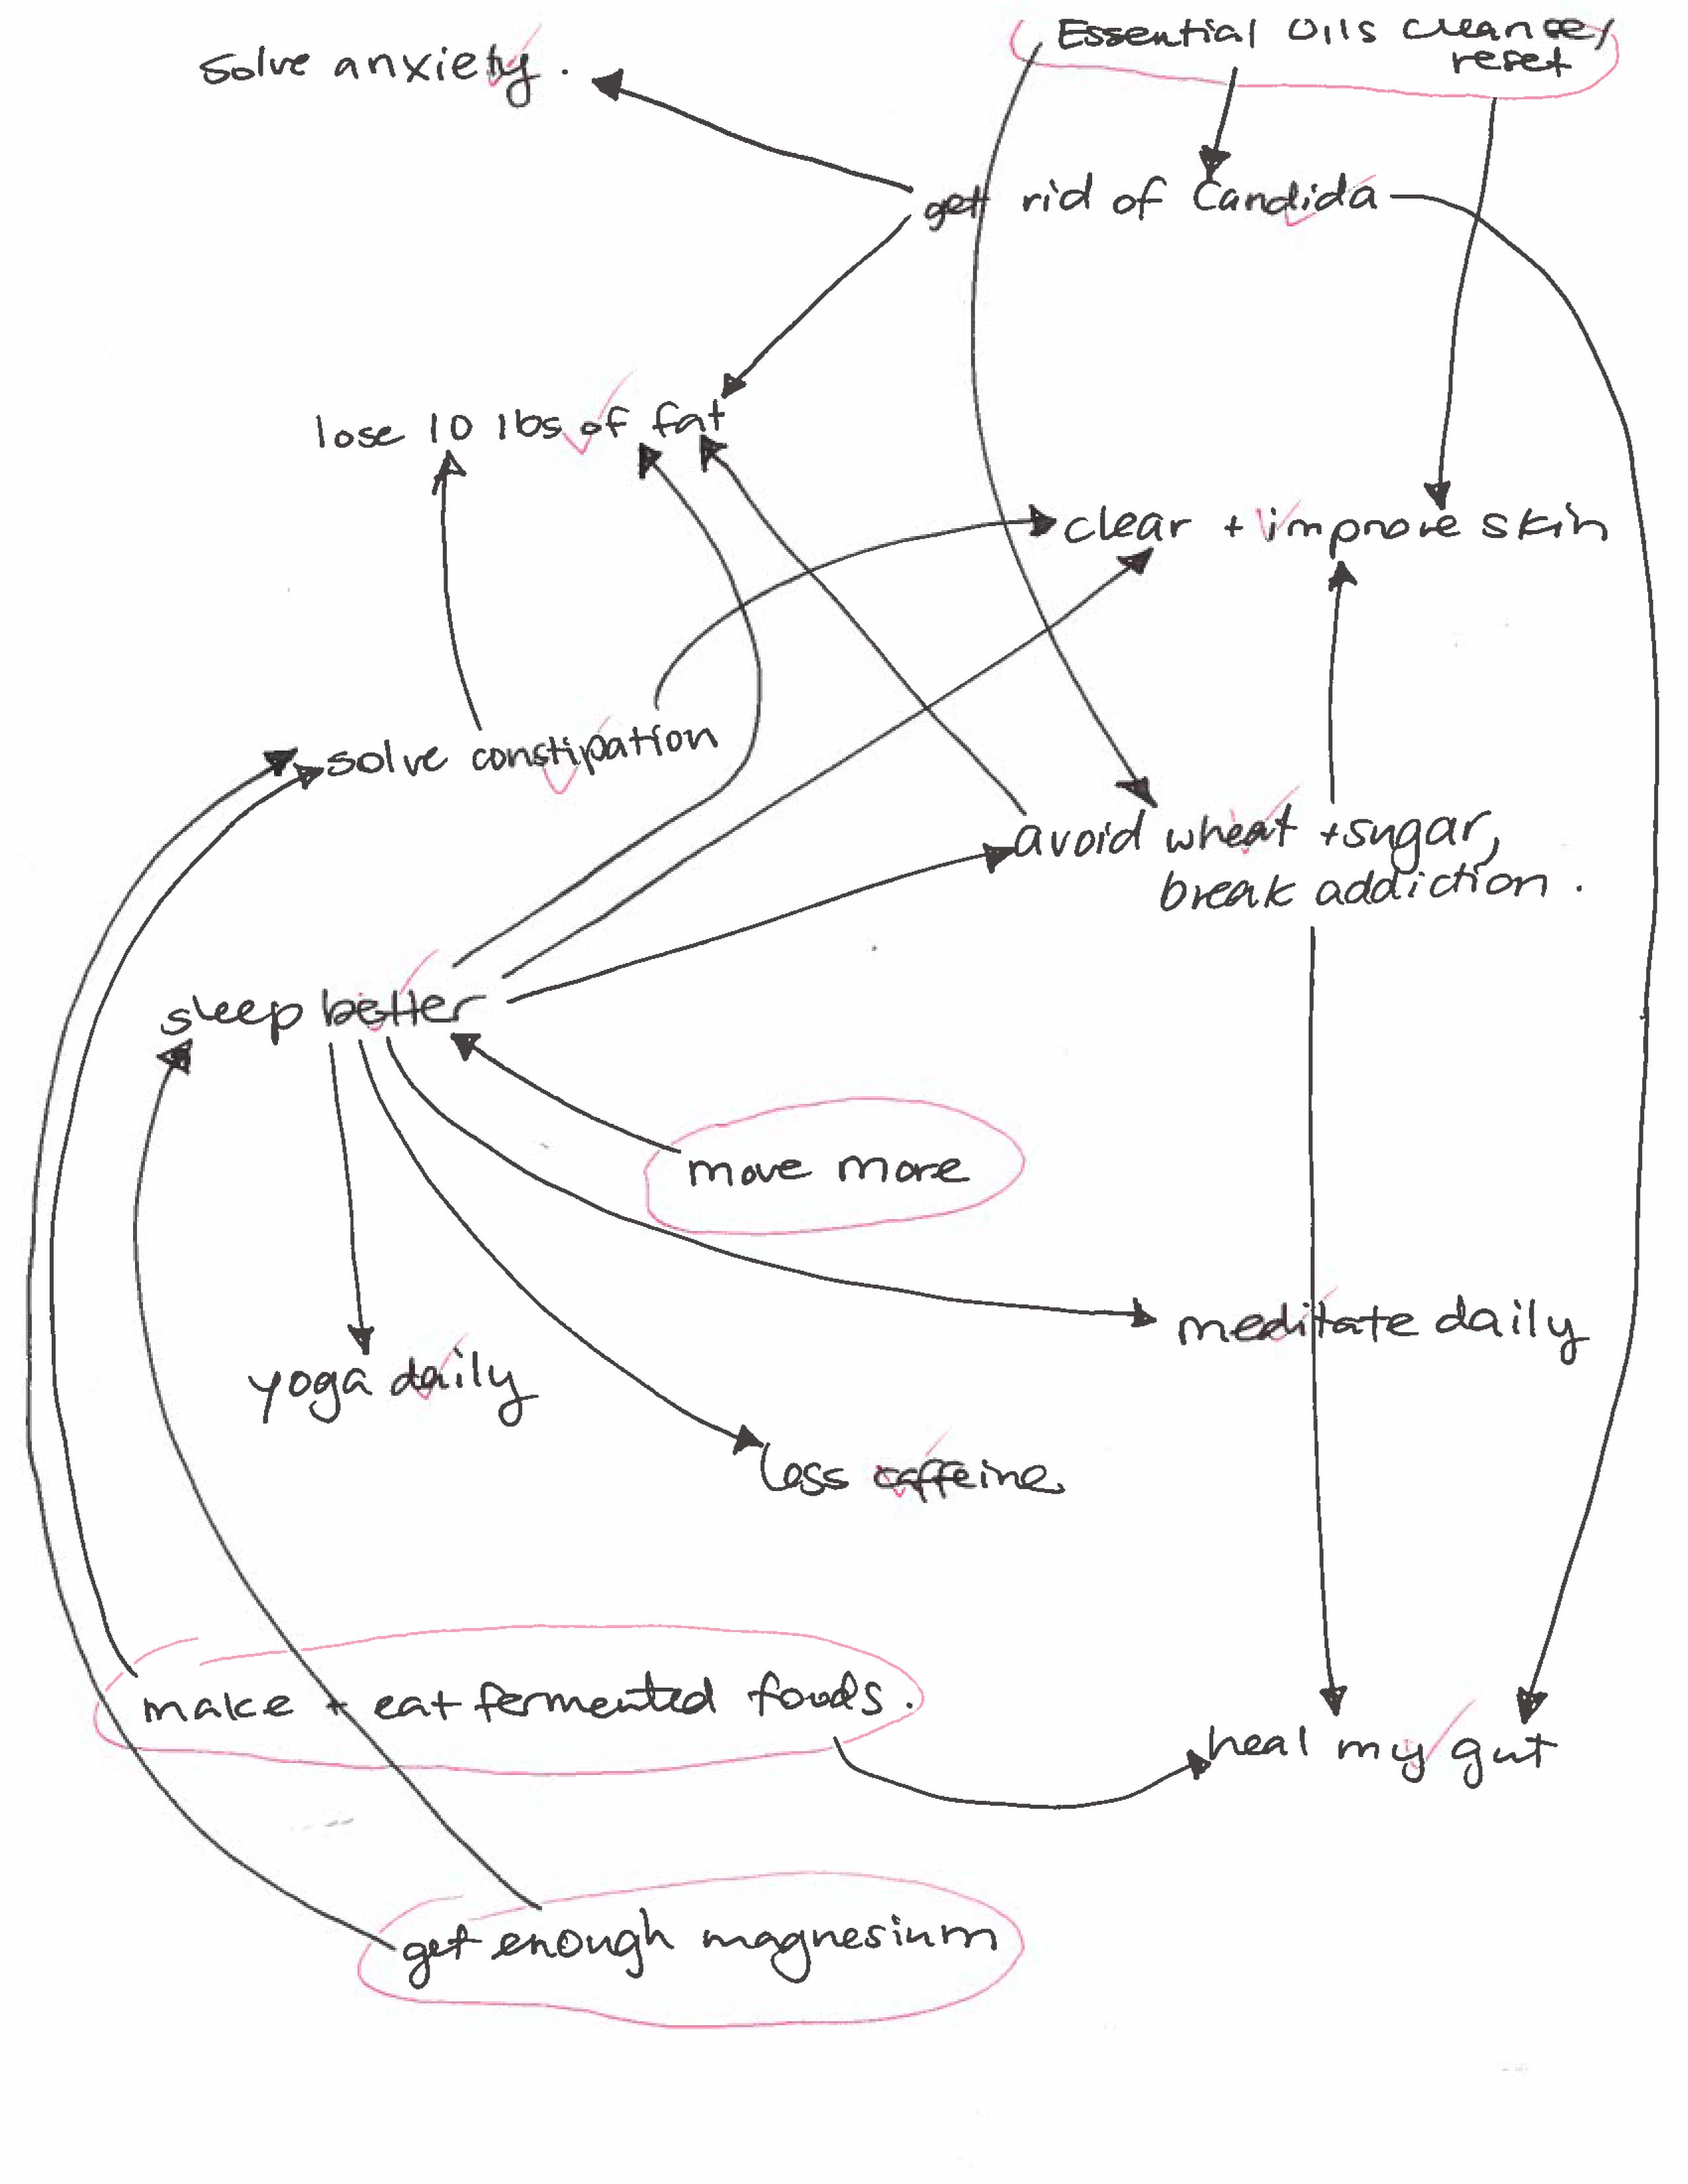
These are the things you actually need to straight-up do, which will lead to all your other goals eventually rolling out as by-products. I’ll call them Actions.
Go over the other items on your page and just checkmark each, so you know that one of your big Actions is going to help you achieve each of your smaller goals. Check out my work below:
Thrive Primal - how to prevent overwhelm with lifestyle changes

 STEP 4:

List out the specific little steps that will lead you to be able to do the Actions you determined in step 3, ie Buy magnesium oil, get a spray bottle, buy the cleanse supplements, buy a cabbage, etc.
List how much time daily or weekly it’s going to take. For example, eating fermented foods is only going to take me let’s say an hour bi-weekly to set up a new batch of sauerkraut and kombucha, and then only a couple of minutes daily to consume a little bit of each.
Once I’ve bought and prepared the items I need for 3 of my 4 Actions (Magnesium, Cleanse and Fermented foods) each of these things will only take a couple of minutes daily (apply magnesium body spray, take my cleanse supplements and have some sauerkraut & kefir with my lunch).
The only thing that actually takes time or scheduling is to move more.
So now I’ve determined really there’s only ONE thing that’s kind of a pain in the butt that I need to figure out. NOT 25 things. 1 butterfly, not 25.
Yes, I still have to find 15-20 minutes a day to crank out some high-intensity intervals or power yoga with a youtube video on my mat in the living room in my undies. But now I know that all my goals are accounted for, and I can just take that 20 minutes and relish it and not stress about whether I’m taking care of everything I should be.

Why this is so powerful

Once you’ve figured out your Actions, don’t question them or think about anything else or let the butterflies start flying again.
Do these 4 things (or whatever number you’ve determined but 3-4 max!!) and do them CONSISTENTLY for at least 2 weeks. You can do them mindlessly and just shut off. You’ve done the mental work and the leg work by buying and preparing your stuff. Now stop over-thinking it and just go, on auto-pilot for 2 weeks.
Doesn’t that feel great? Isn’t it awesome being told what to do sometimes, especially when it’s by your own smart self :)
Flipping back and forth to different solutions and doing partial moves and attacks won’t actually result in any big succesful change. It’s like telling an army to advance, wait no retreat, actually let’s bring in the cavalry, actually wait a second where’s that catapult….you’re never going to win that battle!
You have to make the well-considered decision and then go for it whole-heartedly.
After 2 weeks maybe you want to re-evaluate, and that’s ok. If it’s going great, AWESOME, and maybe your 4 things have become automatic and now you can incorporate a few more actions, if you need to.
Maybe your list of a few things is still too overwhelming and you’re floundering. In that case the trick is to pick ONE thing that takes the least effort but has the most impact.
For example in my case I could reason that consuming fermented foods will end up helping me absorb, digest and eliminate my food better, so I won’t need to do a cleanse or take supplements.
Make that ONE thing happen each day and give yourself a HUGE pat on the back for sticking with it!! It’s a VERY important step in the right direction. Not only the actual action itself, but the fact that you’ve subconsciously affirmed that you care about yourself and love yourself.

 How can I help you with this?

Do you have a list of goals but aren’t sure which are the big tipping-point Actions? Are you trying to whittle it down to which is going to take the least effort but have the biggest impact? Let me know below, I’d love to help!
Thrive Primal - how to avoid getting overwhelmed with healthy lifestyle changes
want to pin this_Thrive Primal-01

Real Food Recipe: Easy Healthy Plantains in a Pan

Thrive Primal - easy healthy plantain recipe

Have you ever seen those oversized weird-looking bananas at the supermarket? They’re plantains!

A staple in traditional island diets, they’re a bit of a wildcard here in North America. They’re worth learning how to cook, because they have some great nutritional benefits. One of my favourite Paleo/Ancestral practitioners, Chris Kresser, talks about plantains a lot on his podcast. It sounds like has them for breakfast almost every day with his 1-year-old daughter.

Plantains are high in resistant starch, which produces a fatty acid called butyrate in the lower digestive tract. This provides food for beneficial bacteria, improves insulin sensitivity, and may also have anti-cancer properties!

And man are they DELICIOUS. This has become one of our favourite veggie sides that we look forward to.

Easy Healthy Plantains in a Pan

This recipe has lots of good traditional fats as well as anti-inflammatory properties from the spices. Make sure you grab the plantains from the supermarket when they’re still green or just barely yellow, since they start to get more sugary as they ripen and won’t be as beneficial for resistant starch.

Real Food Recipe: Easy Healthy Plantains in a Pan

Prep Time: 2 minutes

Cook Time: 20 minutes

Yield: 1 plantain for 2 people

Real Food Recipe: Easy Healthy Plantains in a Pan

A simple, easy plantain recipe with healthy traditional fats and anti-inflammatory spices. Prepare yourself, it's delicious!!

Ingredients

  • 1 green or barely ripe plantain
  • 2 tbsp grass fed butter
  • 2 tbsp coconut oil
  • 1 tsp chili powder
  • 1 tsp turmeric
  • 1/4 tsp cayenne
  • 1/4 tsp pink Himalayan salt

Instructions

  1. Heat your pan on medium heat with the 2 tbsp coconut oil and 2 tbsp grass fed butter. Ensure it never gets so hot that the oil starts to brown or smoke.
  2. Cut the ends off the plantain, and make a shallow cut along the length just through the skin. Then you'll be able to peel it.
  3. Slice the plantain into rounds about 1/4" thick, and place them in a single layer in the pan.
  4. Sprinkle all the spices and salt evenly over the plantain slices.
  5. Let them cook on one side for a few minutes, checking them until you see they're getting just slightly browned.
  6. Flip them one by one onto their other sides, then mush them gently with a fork, just to break the surface. THIS IS THE MAGIC. Now they will soak up all the delicious butter and coconut oil.
  7. Let them sit until they have soaked up most or all of the oil. You can leave them on low heat until you are ready to eat them.
  8. Have them right away (tastiest!) or they are also good as leftovers. Serving with some good quality sour cream is DIVINE.
https://www.thriveprimal.com/real-food-recipe-easy-healthy-plantains/

If you try this recipe, let me know what you think! It’s definitely become a regular part of our rotation. YUM!

Do you have any other yummy plantain recipes to share?! Post in the comments below! :)

Have you had any benefits from consuming resistant starch, or any effect on your digestion? Share below!

Thrive Primal - easy healthy plantain recipe


want to pin this_Thrive Primal-01

How to keep your feet healthy & prevent or reverse bunions naturally

Thrive Primal - prevent and cure bunions naturally

All the women in my family have bunions. And that freaks the crap out of me.

I don’t want yucky claw feet that look freaky in sandals, and more importantly that hurt all the time!

This is exactly the sort of thing I love to investigate a natural prevention or cure for. We don’t have to be victims to these sorts of conditions. A bunion isn’t something that attacks and we just have to succumb to. Although it’s true that some people are more prone to them (like my family) and some people can wear pointy shoes to their heart’s content and never get them.

But generally speaking a bunion happens over time, and it’s something we can prevent and even reverse naturally.

I want pretty, pain-free feet forever

Probably around age 25 I started to notice my feet would be kinda achey if I wore pointy shoes for the day. The pain was mainly in the big toe joint. Eventually I made the connection that this could eventually result in bunions. I started researching prevention immediately!

When you’re naturally more pre-disposed to getting them, you can’t just avoid pointy shoes, you have to proactively reshape your feet to keep them flexible and youthful.

image source

How to prevent & treat bunions without surgery

1. Get some toe stretchers! Mine are called Profoot Flex-tastic Toe Relaxers and they are TOTALLY AWESOME. At first I wore them every night for 5-10 minutes just when I was eating dinner or relaxing for a bit in the evening. I did that for maybe a week or 2.

Now, I only use them every couple of months if I feel a bit of tightness in my toe joint. They feel sort of pressurey when they’re on, but not uncomfortable. And then when you take them off your feet feel oh so flexy and lovely, like you want to do a twinkle toe dance. Very rejuvenating!

Another suggestion for relieving any pain and inflammation is to use some Deep Blue pain-relieving essential oil. It’s great for muscle and joint pain of all kinds. You can also rather conveniently get is as a rub.

We don’t realize how much stress our feet take every day and we should thank them and take care of them! If we don’t they will turn on us and make our lives hell! :)

2. Do some yoga! 

I’m not saying you have to spend an hour every night practicing or get a membership or learn how to do a headstand. I’m just saying use your toes mindfully when they are out of shoes. Use them to balance, spread them and grip the floor, and feel the power of each little tiny hard-working toe.

I’ve noticed since I’ve been practicing yoga semi-regularly my toes get sore a lot less often. I love balance poses like Tree, Chair or twisting lunges and arching upward while in downward dog to really feel the toe power!

Here’s a nice half-hour video with Yoga with Adriene that you can try. See how your toes (and obv your whole body!!) feel afterward!

And finally, yeees, you do want to avoid wearing those pinchy pointy shoes every day. Maybe keep them just for a sexy date night or when you need an extra confidence boost. It doesn’t mean you have to wear granny shoes, but a more natural toe shape that doesn’t literally re-shape you foot into a sad, cramped, diseased state is probably a good call. Your future self will thank you when you can still go for a nice nature hike when you’re 80 ;)

Please share below…

How do you show your feetsies some love? What tricks have you discovered for lasting foot health? Let us know in the comments so we can all help eachother out!


Thrive Primal - prevent and cure bunions naturally


want to pin this_Thrive Primal-01

Things I’m Loving in January 2015

Thrive Primal - things i love jan 2015

I want to make this blog a little different in that it’s not just about the serious health stuff. I want to share some fun things too! Maybe even a little fashion, music, and other fun lifestyle stuff.

These things are actually very important for primal lifestyle design, because they play a big role in personal development and the ‘lighter side’ of a primal lifestyle – meaning the social, play-related side.

I also find I’m always curious about the real NITTY-GRITTY of someone’s day to day lifestyle. Like what they ate for breakfast, or what sort of relaxation tools they use. I mean the actual specific things or strategies, not just general philosophy.

So I hope you find the “Things I Love” series fun, useful and insightful! Hopefully we can find even more things to relate to each other with, beyond just our nutrition obsession :) Plus I’d like to strike up a discussion in the comments where we can share our favourite go-to’s, latest discoveries and best tips.

Thrive Primal - things i love jan 2015

 Thrive Primal - things i love jan 2015LISTENING: Asgeir Trausti

Sooo the other night, I listened to Asgeir’s album 3 times in a row in English, then twice in a row in Icelandic, and then once more in English. Obsessed much?? The more I listen, the more I love… Check out his album here or grab a copy here. Plus I totally dig his tats ;) Let me know in the comments what you’re listening to lately!

READING: The 5 Love Languages

Personal development and relationship development is a big part of primal lifestyle design. I had heard that this book is great for understanding one’s partner’s needs and ensuring they feel loved in the particular way that they most relate with and value. I think continuing to consciously cultivate one’s relationship is vital, so Will and I are reading this book this month! Check out a copy here.

EATING: Grass-fed beef bone broth

I’m healing my teeth and keeping my joints and gut healthy this month (and every month) with bone broth! Check out my tips here on how to always some ready to go in the fridge. Find out where to grab properly-raised meat in your area with farmmatch.com or eatwild.com. I know there’s also US Wellness Meats in the states, but haven’t found a good online supplier in Canada. Let me know if you know of one!  Also, you’ll be needing a crock pot! (aka slow cooker). Do yourself a favour and get this pretty one, which won’t be such an unsightly beast in your kitchen ;)

USING: Immunity & Metabolic blends

These doTerra oils are serving 2 important purposes for me this month. Slim & Sassy is helping me cleanse toxins and lose some paunch collected over the holidays. OnGuard is helping us keep our immune systems working optimally. Neither of us have gotten sick yet this season! Despite being around LOTS of sick people, like over Christmas when my little sister was literally coughing germs all over my face. I was just like bring it on! I feel iron-clad! Here’s how to get your paws on these essential oils.

DRINKING: DIY Rooibos Latte

I love crafting deluxe teas and coffees at home. I’m often making fatty coffees on weekend mornings, but I’m always looking for caffeine-free options to enjoy later in the day or as dessert. Rooibos has lots of antioxidants and minerals and I love the flavour. I made Will a latte with a little cinnamon this evening and he said it tasted like ‘baked apples’ – yum! Just heat up some milk on the stove until slightly steaming, then shake it in a jar and pour on top of the tea in a mug. Grab some good rooibos tea here.

WEARING: Big Infinity Scarves

I am basically permanently wearing a big chunky scarf like this in the winter. Like I basically have no neck. It’s so cozy and I love all the textures and colours. Usually I layer a big scarf with a long top or sweater, leggings and boots. Plus a long necklace with some natural stone or amber, and some fun earrings. That’s my winter uniform!

Let me know in the comments what your ‘winter uniform’ go-to outfit is! :)

MOVING: Biking in the snow & Yoga with Adriene

I’ve just made the decision recently to not let the cold weather keep me off the roads with my bike. Public transport in Toronto is frustrating to say the least, so biking is free, faster and keeps me moving! I’m still in the process of figuring out my perfect winter biking gear combo…Let me know if you have any pro tips!

Yoga with Adriene is often my go-to for indoor movement or restful exercise. I love her genuine personality and how she instructs. Oftentimes the way she describes a pose makes me adjust my body slightly and then I go “ohhhh, that’s how that’s supposed to feel!” I love Yoga with Adriene!

RELAXING: Beeswax candles

I absolutely LOVE beeswax candles. They smell SOO nice (like honey!) and they have so many benefits. Turns out regular paraffin candles are pretty darn toxic (!!) since they’re made from the sludge in the bottom of oil barrels and are subjected to various chemical processes, resulting in a carcinogen-emitting abomination. I wish I would’ve known that a long time ago! I totally used to crank through those cheap tealights from Ikea. Anyway! Beeswax is awesome, it purifies the air and helps against allergies. Grab some here and get burning! Using candles at night is great for a calming atmosphere to get away from blue-light pollution and enhance sleep.

Share what you’re loving below

Well that’s a wrap folks? What are you loving this month? Any great discoveries or lessons learned? I’d love to hear from you ;) or share on the Thrive Primal Facebook page!


Thrive Primal - things i love jan 2015

want to pin this_Thrive Primal

Real Food Recipe: Primal Gluten free Zucchini Pancakes

Thrive Primal - primal gluten free zucchini pancakes recipe

You have got to try this pancake recipe!!! I whipped it up this morning and man are they tasty…the zucchini adds a little bit of nice moisture to the mix, as sometimes gluten free pancakes are sort of dry and sawdusty (especially with coconut flour because it absorbs so much moisture).

A great bonus is that they actually stay together and you can flip them nicely in the pan without them falling apart. They turned out beautiful!


I served them with a sauce made of frozen blueberries and fresh whole cranberries simmered in butter with a tablespoon of honey.

Thrive Primal - primal zucchini pancakes recipe

Real Food Recipe: Primal Gluten free Zucchini Pancakes

Prep Time: 10 minutes

Cook Time: 20 minutes

Total Time: 30 minutes

Yield: Enough for 2 people for a large breakfast

Real Food Recipe: Primal Gluten free Zucchini Pancakes

Delicious and nutritious gluten free primal pancakes. The zucchini adds moisture and flavour! Yum! Delicious later on from the fridge as well.

Ingredients

  • 1 grated organic zucchini
  • 3 free-range eggs
  • 3 tbsp coconut oil (soft or melted)
  • 1/4 cup coconut flour
  • 1 cup white rice flour
  • 1/2 tsp Upgraded Vanilla
  • 1 tsp cardamom
  • 1/2 tsp cinnamon
  • 1 cup whey or milk
  • a pinch each of baking soda and baking powder

Instructions

  1. Mix the eggs, coconut oil, whey and zucchini together first.
  2. Add the spices.
  3. Add the 2 flours and the bs/bp.
  4. Mix well.
  5. Heat up a pan on medium with a good amount of butter. Keep the butter just bubbling but don't let it smoke!! If it starts to turn brown it's too hot.
  6. I used a 1/3 cup measure for each pancake.
  7. Let the cake cook on the first side until you can jiggle the pan and top of the cake doesn't look liquidy, then it's ready to flip!
  8. Serve with grass-fed butter, raw honey, organic berries.
https://www.thriveprimal.com/real-food-recipe-primal-gluten-free-zucchini-pancakes/

If you make this, let me know what you thought! How did they turn out for you? I think the temperature of the pan and the butter is pretty important for getting that nice crispy golden texture.

I’ll be posting instructions on how to get Upgraded (high quality toxin free Madagascar) vanilla and also how to get or make grass-fed organic raw whey at some point soon.

https://www.thriveprimal.com/wp-content/uploads/2015/01/Thrive-Primal-primal-zucchini-pancakes-recipe-FB-2-01.jpg


want to pin this_Thrive Primal-01